sept 9 class by tyler galloway

in class
how to order a zine from the print center.

watch and discuss: “strategy by design: how design thinking builds opportunities by tim brown”

how is your process schedule holding up to the reality of the project? what do we need to add / subtract / change?

small group crits over work in progress:

  • is there a concise, one-sentence definition of graphic design? what would make it better?

  • is there a structure or outline for adding detail? what would make it better?

  • what types of visual and textual devices are you using to communicate about what graphic design is? what is available and how do they function?

  • is there a definition of “design thinking”?

  • are multiple visual directions presented? what would make them better?

we will do rolling crits in the studio, in the following groups, for about 20 minutes each:

noah, lynnsie, ricardo, ava

hannah-rae, husnain, ki, anna

shane, cordell, halee

shelby, gillian, jacob

new work
decide on a visual direction to pursue and flesh out the full idea for print and screen. have a semi-final mockup for both ready to go for another small group crit on wed sept 11. 

book club! read “politics of design” pp 1-21. be ready to discuss with your peers what you’ve learned and what was interesting. remember, participation is part of your overall grade for this course.

demo: how to make a digital booklet for the print output center by tyler galloway

use indesign to set up your final document

final trimmed sizes [measurement as you’re holding the final cut/folded object]
5.5” x 8.5” [half-size]
8.5” x 11” [full-size]
9” x 12”
note: if you want bleeds [where image/color/text runs off the edge of the page], you can make your page size a little smaller [example: 5” x 8”] and trim it down yourself.

indesign process
file > new document

Screen Shot 2019-09-03 at 10.05.59 PM.png

set your doc width and height.

the number of pages must be divisible by 4.

if you check “facing pages” [recommended for this project], you can view your document spreads [when two facing pages are seen side-by-side], but indesign annoyingly puts the front cover and back cover all by itself.

you can add as many columns as you like, to give yourself a structure to work from.

set your margins to whatever you want. you can go back and adjust later.

do your thing in indesign!

use the “T” type tool to click and drag a text box, and start typing.

window > type & tables > character to pull up the character panel and control typography.

window > type & tables > paragraph to pull up the paragraph panel and control text alignment [left, middle, right, justified, etc]

file > place to import an image [.psd, .tif, .png, .jpg]

Screen Shot 2019-09-03 at 10.26.30 PM.png

save early, save often!
make a folder for vis com 1. inside that, make a “project 1” folder and stick your zine in there so you don’t lose it on your messy desktop!

name it something sensible like “viscom1-project1-A”. you can name subsequent iterations B, C, D etc, to keep track of your versions and improvements over time, and go back if needed.

export your file as a pdf [print].
file > export
it will ask you to name your file again.
note: this is different from saving your file in the native indesign format.

click “save”. duh.

Screen Shot 2019-09-03 at 10.27.18 PM.png

for the preset at the top, select “press quality”.

under pages, say “all”

export at “pages”. casey’s magic zine maker tool at the print center doesn’t want spreads!

don’t bother with the other options for now.

Screen Shot 2019-09-03 at 10.27.42 PM.png

for documents with bleeds or non-standard-size docs:

first, make sure that in your document, the things that run off the page actually run beyond the edge of the indesign document. standard practice is to go at least 1/8” beyond the document edge.

file > export

do the stuff in the previous step: press quality, all pages, export as pages, etc.

click “marks and bleeds” on the left menu.

under “marks” click “crop marks”

export that sucker!

submit your project online to the print output center [located by the art store] at least 24 hours in advance of when you need it in hand. or you can take a flash drive there and fill out the form there.

sept 4 class by tyler galloway

in class
based on your proposed schedule:
- rough draft / practice presentation
- edit
- think more!
and might i suggest you use chicago style notation system? i might! see below…

brief keynote demonstration

how to make a booklet – digital [indesign] and analog.
- see post elsewhere for specific info and specifications for your document if you wanna have a digital document that is output by the print center.

brief group chat:
- what primary research have you done? with whom? any design professionals? 
- what sources are you using for your secondary research?
- what new questions have you been asking and trying to answer?

a few more free questions for you to ponder while working during desk crit time:
- what are examples of graphic design? how do they function? [visual and written form]
- what's an example of graphic design that is meaningful to you and why? [visual and written form]
- what are examples of “high” and “low” graphic design? is it right to characterize design as "high" and "low"? are there other ways to define areas and sub-sections of the discipline?

review in desk crits in studio [5 min each, 1.5 hours total, as time allows]:
- review research
- review your organizational strategy
- initial ideas for visual approach. notice "ideas" is plural. practice now for iterations on iterations on revisions on edits on semi-finals on near-finals on finals for your project work. "one and done" will not cut it. how do you know your idea is the best one unless you try them all?
- are resources cited in chicago style? 

chicago style info: use the "notes and bibliography" approach mentioned in this webpage. follow the "notes and bibliography" link to this page where many examples are listed for various media types. you can use footnotes [set in small type at the bottom of each screen or page] or end notes [all collected at the end of your presentation or booklet], and then a bibliography at the end.

new work for next class
prepare work for small group process crit. what do you need to have a productive critique session? what does your schedule say?

setting up design printers on your laptop by tyler galloway

log in to mykcai with your username [first half of your school email] and your password [usually your email password]

click on “more” in the blue menu across the top, then click on “technology”.

one.png

click on “printing in departments and labs” on the gray-colored left sidebar.

two.png

in the middle section, under “links to instructions”, click on “graphic design hp printers”. this will allow you to print to all black and white printers that you choose to set up – 101, 102, and 118. follow all directions closely.

to print to the konica color printer, select “Graphic Design and Illustration Printers for Macs” in the middle section [see above image]. follow all directions closely.

august 28 class by tyler galloway

in class
talk time!
setting up printers [see blog post for help]
[per student project timeline] research, organize, think!
so, check-in on what you were supposed to do
- is your partner definition still relevant? what changed? what remained?
- where / how did you do additional research?
- what organizational strategies did you use?
- what are you thinking at this stage?
and…let's organize your info as a group. what are common terms? what are unique terms? how does that help you individually and what does it tell you? 

also

keynote demo

also

let's talk about questions [free questions from me, aka new things for you to ponder]:

  • what are the differences and similarities, if any, between graphic design and design thinking?

  • who uses graphic design and to what ends?

  • how does gd function in relation to culture? [written form]

  • what are the boundaries of the discipline?

and make sure...

  • all of your writing is in your own voice, with a consistent approach, p.o.v., level of in/formality, etc.

  • you are properly citing all sources, to give proper credit to your synthesis of ideas as well as establish credibility [ that you did your homework on this].

  • you are *looks down at project brief* working toward a one-sentence definition and some form of expanded definition / explanation[s], both of which are understandable by your parental unit[s].

and finally…

10am mentorship speed matching session!

new work  for wednesday sept 4
[per student project timeline]
edit
rough draft [what does this entail? what is needed / desired / helpful to your elders?]
practice presentation [i assume this means you have a presentation to practice]
think more!
from tyler: use chicago style notation system

anything else?

student-proposed timeline for "define / explain" project by tyler galloway

we can add more detail to this as needed.

aug 28 – wed
research / think!
organize! / think!
think! / think!
keynote demo

sept 2 – mon
no class – labor day

sept 4 – wed
rough draft / practice presentation 
edit
think more!
use chicago style notation system

sept 9 – mon
peer review / crit
revise

sept 11 – wed
final draft
practice printing
practice presentation

sept 16 – mon
booklet / presentation

aug 26 class by tyler galloway

in class
hellos

syllabus

getting p-counter account at biz office

project 1

one minute definition + share out

five minute definition + share out

how to ask questions

work out schedule: what are the phases of a creative project? how much time do you need to produce this? what do you need to know to produce this? how much time for researching? for design? for production? for revisions? 


new work for next class [in this order]

  1. continue to define graphic design from your own perspective and experiences.

  2. ask more questions.

  3. conduct other primary research as much as possible.

  4. conduct secondary research to gather others’ definitions

  5. work as expansively as you can, using visual, written, diagrammatic, informational, poetic, emotional, and any other form you can come up with.

bring your laptop for printer setup on wednesday. 

adobe font folio education essentials by tyler galloway

this package of 500 fonts for only $150 [believe me, it's a steal] gives you a solid start on a basic and classic type library you can use legally and fully once you purchase. start by checking this list of fonts against what you already have. if you already have most of these, then you can pass. if you are missing many of them, then i'd highly recommend purchasing this for your time at kcai. 

scroll to the bottom of this page to order online or you can call 800.585.0744 to order by phone. 


adding fonts from adobe fonts online [formerly known as typekit]!

adobe fonts is an online resource that you can activate through your character palette in indesign, illustrator, photoshop, etc. because kcai has an institutional account for creative cloud, you have access to adobe’s "free" plan. this gives you access to sync limited fonts through adobe, which magically appear in your font menus. awesome!

how to add in indesign and illustrator
these two programs have made it incredibly easy.
- simply open your character palette [ in the topmost menu, select window > type > character].
- click on the font name drop-down.
- at the very top of the font listings, select “find more”
- the menu will switch to all adobe fonts that are downloadable from the cloud for your use.
- a message will appear saying “click the ‘activate’ button to activate fonts”. the “activate” button is the cloud on the right side of the font menu [see image below].
- click the cloud, and that font file should be added to your menu of available typefaces. yay!

typekit.png


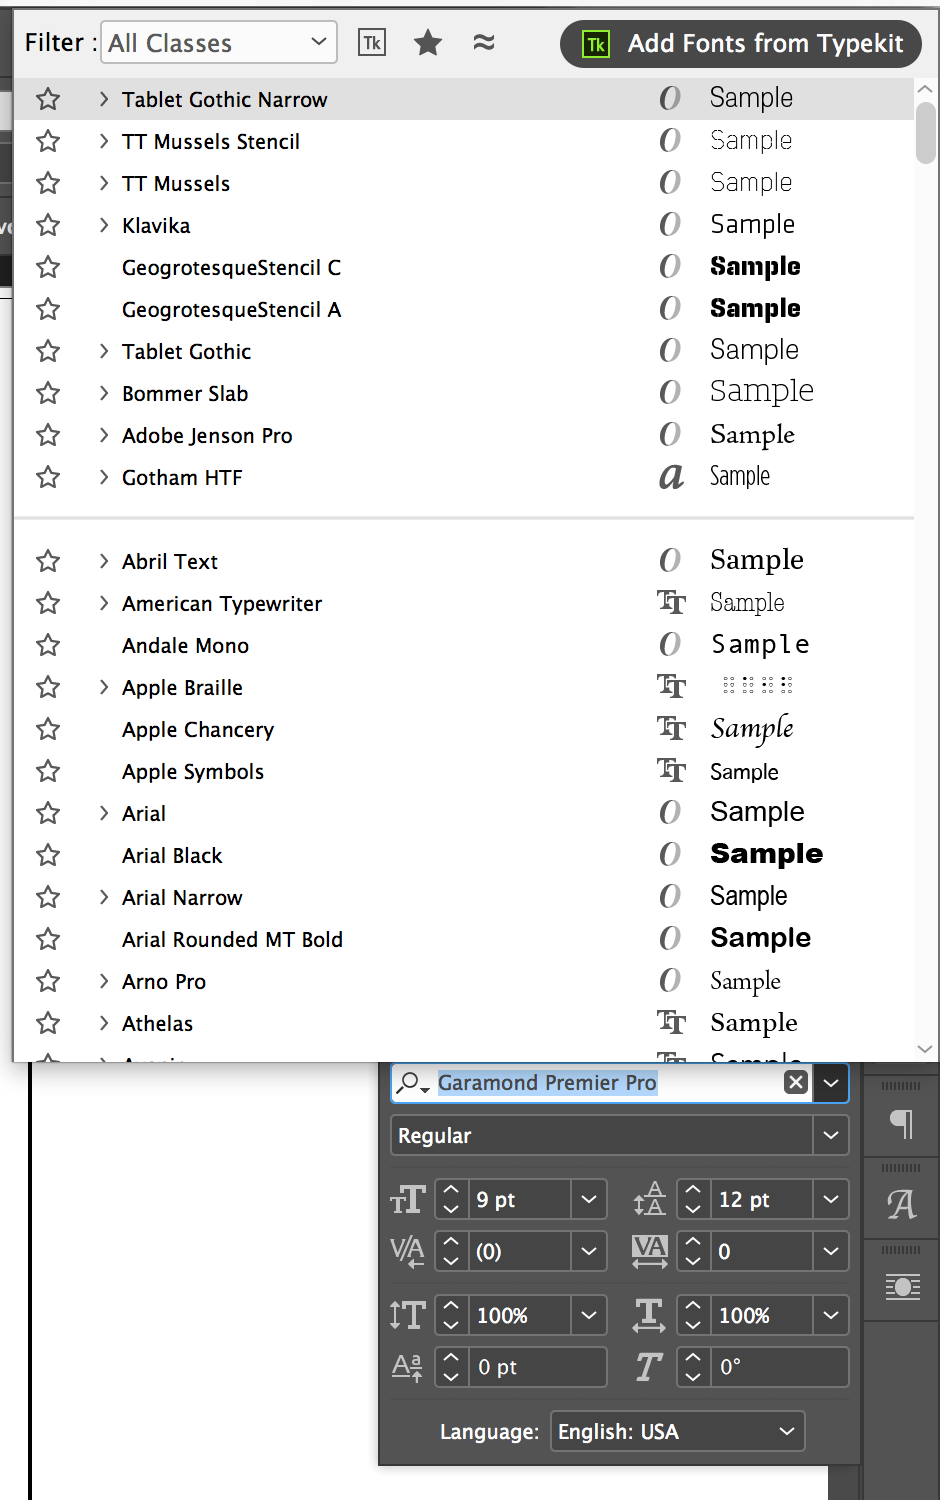
how to add in photoshop
in your character palette, click on the font name drop-down.

scroll to the top of the font menu and click on the "add fonts from typekit" button.

Screen Shot 2018-08-19 at 9.14.19 PM.png
 

you will be taken to the typekit webpage, where you'll have to log in using your adobe i.d. 

once you are logged in, you can browse the collection or search by name or classification. click on the face or faces you want and hit the "sync" button to activate it. neato!

typekit-activate.png


hello world! by tyler galloway

welcome to the graphic design department! i'm super excited that each of you have decided to pursue a life in design and start the foundation of that life at kcai. it will be full of newness at every corner, full of challenges, successes, and failures. all of this will make you grow into a thoughtful, passionate, and mature graphic designer by the time you graduate. our primary job as educators is to facilitate your learning in a way that will be of use to you for the next 45 years. no easy task, right? well, our time together will prove short – i promise you that, as it's about 24 months in total – so let's get right to it!

please review your syllabus here here here here. as you know, you are responsible for its content. yay, right?
and don't forget you are responsible for kcai policies and GD department policies as well.